
Arrggh and avast ye smarmy poop-deck-swabbers! ‘Tis that time of year when ye pirates and pirates wenches be bringing out yer best verbal swashbuckling because it’s Talk Like a Pirate Day! And in honor of this most holy of pirate tongue waggling holidays, the good ship Don’t Eat The Paint has sailed pack into port to teach you youngun’s all about peg legs! That’s right you land lubbers--Captain Blue Tape is here to help you greenhorns get your sea legs by sticking pegs into the legs of yer wild plastic stallions.
[coughs]
[clears throat]
Okay, I can’t keep that up for an entire tutorial. Nonetheless, welcome to a new season of Don’t Eat the Paint! (Brought to you by my new found impulse to blog again and also talk like a pirate.)
So I’ve been asked a few times in the past to talk about how I move legs, and I’ve been dragging my heels (Ha!) on the topic somewhat because it’s a complex one. Accordingly, I’m trying to break down the topic a bit more and tackle the smaller bits one tutorial at a time. I decided to start with how I “peg” (or “pin”) a leg because this is the construction technique I use the most often.
If I’m just doing a simple custom with a small tweak, I peg/pin the leg:

If I’m doing a restoration/repair to a broken OF, I peg/pin the leg:

If I’m doing a crazy drastic custom where I use almost none of the original body, I still peg/pin the leg--or whatever little bit of the foot I use:

Ingredients (for a Jaunty Peg Leg)
1 plastic pony
1 dremel
1 power drill
1 bottle of super glue
A dash of baking soda*
1 wire of a moderate to large gauge
A wad of Apoxie or equivalent brand of self-drying epoxy-based clay**
*An approximate dash. Keep in mind, I'm using the imperial dash measurement system here.
**Again, this is an imperial wad, not a metric wad.
I'm particular about what brands I use. If you haven't read my posts on Brands I Prefer, you can catch them here and here.
The Victim Walks The Plank
Overall, this Morgan is a deceptively simple custom. I didn't move him into a galloping position or anything crazy--I just squared him up a bit and am dropping his head down for performance. I started out with a heat gun, softened the plastic around his stifle and tried to see how far I could move him without 1) having to chop off the whole hip and start from scratch or 2) making his leg look like a messed up wet noodle.
But as you can see, the heat gun got me close but not all the way there (and he doesn't look like a pile of noodles). His left leg is $0.35 longer than his right, and it angles slightly inward:

Someone Bring Me My Leg Chopping Sword
Rather than struggle with a heat gun (which won't solve the mismatched leg length issue anyways), I decided to cut off, shorten, then reattach his left leg.
There are quite a few Breyer molds out there that could really benefit from having better matched leg lengths. I love the Sham mold dearly, but one of his legs is nearly 1/2" longer than the other. +1 internets to the first person in the comments to correctly name which of Sham's legs is the longest and least proportional. If you're going to do a simple or moderate custom on a mold who is otherwise nice but has mismatched legs--such as Carrick--using this technique to even them up can go a long way to impressing custom judges.

Back to my Morgan, before I get all dremel happy, I mark where I need to cut his leg and (most importantly) how much I intend to cut off. It takes me far less effort to measure and mark a model before cutting him up than it will take rebuild him if I take off too much.

For these cuts, I'm using my diamond cutting wheel bit:
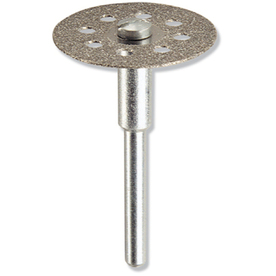
When I start dremeling on a model, I always start with the cuts that are farthest from the body and work my way in. So if I needed to cut a model's leg apart at the pastern, cannon bone, and hip, I start with the pastern and work my way up.
While I am a prickly and a slightly obsessive person by nature, this isn't me just being OCD. If I started with the big cuts closest to the body and worked my way down, I wouldn't have very much left to hold by the time I got down to the hoof. Voice of experience--you don't want to hold a diamond cutting wheel that close to your fingers. You will need those fingers to complete this tutorial.*
*The fact I've survived this long in life with all 10 of my fingers is a minor miracle.

First cut on my Morgan to take off his leg. Second cut takes off the extra length.
Before reattaching the leg, I need to grind back the edges on both sides of the cut. I get pretty aggressive rounding off the edges as the more I dremel off, the more space I'm making to fill with Apoxie to hide the cut.
I use this bit to grind the edges:
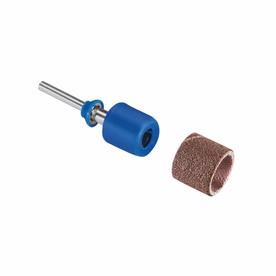

Nicely ground edges. Make sure to do this on both sides of the cut.
Reattaching a Severed Limb
I find the trickiest part of reattaching a leg is reattaching it in a way that it stays attached. Most of the wires I use to support things like manes and tails are pretty soft. That's fine on a tail that doesn't have to support the weight of the rest of model, but can be a little risky on a weight bearing leg. Luckily, my Morgan here has all four legs on the ground to spread his weight and is relatively light. When he's done, he might weight 8 to 10 oz. But I can't say the same about Secretariat here:

"Big S" weights 2 1/2 pounds (not including the base) and stands on one teeny tiny leg. I've had to completely redo him this year because the first steel rod I used to in his leg wasn't strong enough.
Moral of the story: uses the strongest (reasonable) metal peg you can get when reattaching legs.
For the Morgan, I decided to go with a tiny-headed nail. Your local hardware store should have a selection of them and I find them handy to keep around.

Next, I found a drill bit that was just slightly bigger than the head of my nail:

I want to make a hole that I don't have to struggled to get the nail in, but I don't want the hole so big that it just flops around in there. There is a joke I originally planned to put here, but some of my readers are young, and I don't want to get angry letters from parents.
Anyways...you want a tight fit but still need the nail to move in and out easily.
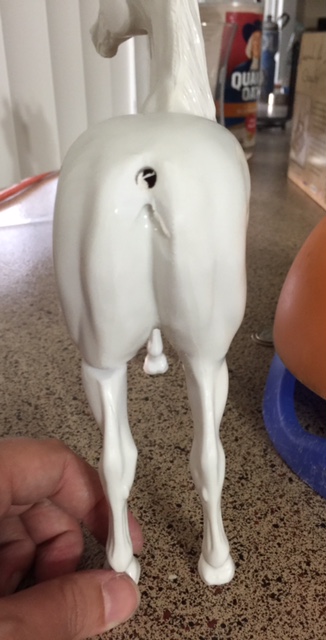
I use a power drill and the drill bit to drill a hole in both pieces. I'm especially careful drilling into the leg as it's easy to poke a hole all the way through and very annoying to repair.

Because I cut at thicker part of the legs and had a little bit of wiggle room, I eyeballed where to put my second hole and just went for it.


However, if I'm trying to realign thinner portion of the leg, I'll put a dob of wet paint around my first hole, align it with the other side of my cut, and gentle press the two pieces together. Ideally, this will leave a small circle outlining where you need to put your second hole.
When I'm done drilling, I reach for my super glue and fill the leg side hole with super glue. Thinner super glue is best here, as it's very easy to get air bubbles under your wet super glue. Some bubbles are inevitable, but less air is better. I fill the hole all the way to the top while being careful not to spill glue all over the leg, the model, my hands, my shirt, my new jeans I shouldn't have been wearing for this, etc.

I insert the nail slowly, popping a few air bubble as I go.

Next, I covering everything with a general covering of baking soda.

Then I blow off the extra baking soda. If there is still visible space between the nail and the hole, I fill the space with super glue again, hit it with baking soda again, and repeat until the nail looks secure.

Because this is a supporting leg, I find a flat surface to stand him on while reattaching the leg to the body. I put a small amount of super glue into the body-side hole (not so much that it will drip), stick in the nail, and stand the whole horse upright. I adjust the position and rotation of the leg quickly before the glue dries. Sometimes this takes a few tries.
I don't sprinkle baking soda on him at this stage. I walk away for a little while, giving the glue a chance to dry all the way.
After about 10 minutes to 10 days (I get distracted easily), I pick my horse back up very carefully. It's unlikely the little super glue I used has very much of a hold on him--it's only intended to hold his leg in position long enough for me to put baking soda and super glue in the gap to genuinely secure the leg.
I partially fill whatever gap exists between the leg and body by alternating a drop of super glue and pinch of baking soda. This guy took about 10-15 drops and pinches before the leg felt really secure. I've still left space for apoxie over the top, but apoxie alone is too fragile to hold this leg secure through a few years of use a performance horse.

Next, I wash off the extra baking soda. Either running him under water with a slight scrubbing or blasting him with the sink sprayer for a few second should get him clean enough. I've forgotten this step before, but the soda can make it so my apoxie doesn't want to stick. I walk away and let him air dry for about 20-30 minutes as the water droplets might disagree with my apoxie as well.
If I remembered to measure twice and cut once, I should be able to fill the gap with just a tiny ball of apoxie. I smooth and blend the apoxie into the existing structures of the leg. I finish him off by going over the apoxie with a soft brush dipped in either water or rubbing alcohol.

[clears throat]
Arrrgghhhhhh. That's all for this episode of Plastic Ponies Walk the Plank with Cap'n Blue Tape. Tune in again in a few weeks when I show you yellow bellied rotten scoundrels how to turn a horse into a mule!


6 comments:
But what if you're repairing a glossy alabaster Fighting Stallion that you'd searched for for many years and when he finally arrived his hind leg stayed in the box?
" However, if I'm trying to realign thinner portion of the leg, I'll put a dob of wet paint around my first hole, align it with the other side of my cut, and gentle press the two pieces together. Ideally, this will leave a small circle outlining where you need to put your second hole."
Brilliant!
For restoring OFs, I pin them the day way and "glue" them back together with Breyer Sludge, which is Breyer plastic dissolved in acetone to make a plastic type glue. With generous applications of acetone on both sides of the break plus sludge in between, you can do a "good as new" repair. Although I would practice this on a body before trying it on your believed guy.
I agree with Danielle... that method for making a matching hole is completely brilliant. So simple. Yet so brilliant. I will definitely be using that.
I'm sure you know this Laura, but for anyone else reading- if you are doing mini scale models in particular, I highly recommend buying a set of drill bits for your dremel. That way there's no need to switch to a power drill. The bits are relatively cheap and you can get sets that even include teeeeeeny tiny bits... so you can even do this pinning method on Stablemate foals or other wee-legged creatures.
Thanks for this tutorial! Very helpful! Good to see you posting again =D
thank you so much for share with us like this post and infos really
ArganOil
Post a Comment