When Should I Lengthen a Back?
Last time on “Don’t Eat the Paint”…
Some breeds have long backs. Some have short backs. Ponies are usually long:

I mentioned show drafts had short backs, but all draft breeds are not consistent on length. In general, European working-bred drafts (Brabants, American Creams, some Noriker lines*) have long torsos and shorter legs. I’m going to say their lower center of gravity gives them greater pulling power, but I’m making that up.
*The Noriker is a breed with a long an interesting history. Their body type has changed, several times, over the centuries to conform to the current needs of their breeders.


Show drafts (Clydesdales, American Belgians) have short backs and long legs. It’s aesthetically pleasing to many horse people. These breeds look great in a hitch:
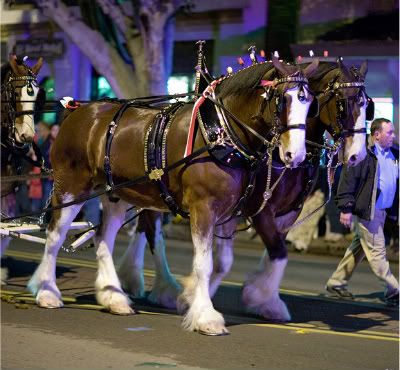
What's not love? Long legs are attractive and legs look longer on shorter backed horses. This same bias (for lack of a better word) carries over into the hobby. The downside of this is that short backs on models--occasionally too short--are not uncommon. And judges are quicker to point out a long back than a short one.
However, that doesn’t mean you shouldn’t lengthen a too-short back. Wrong is wrong no matter who sees it. Eventually a smart judge or discriminating buyer will call you out on it.
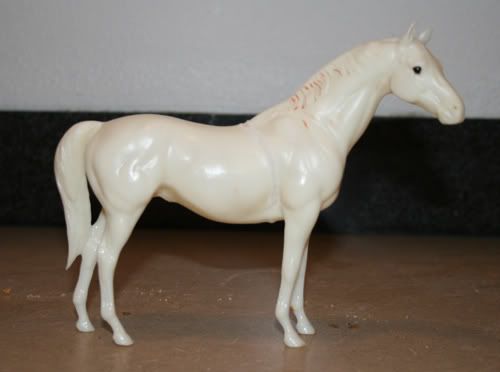
For the purposes of this tutorial, I’d like to change this model’s breed from a miniature horse to a Shetland pony. Two features jump out to me immediately as needing changes: the back and the neck. Miniatures--ideally--share their proportions with full sized horses instead of those of classic-styled ponies. I could show you thousands of exceptions to this, but those are not the minis you’ll see in the show rings.
This horse also appears to be holding his head in a high but comfortable head position. He looks like he could rip around a pasture all day like this. Shetlands (Americans excluded) have a naturally low headset. However, necks are a topic for a separate tutorial.
How Do I Lengthen a Back?
I start almost the same way I lengthen a back. I draw a line around the model where I intend to cut. But the difference here is I’m drawing on a thin line instead of a thick one. I have a choice here in where I want to add the length: the girth, mid-barrel, or the flank.
I already know that my finished model will be chubbier and harrier than the original, so that makes my positioning more flexible. I will be sculpting over a large portion of the torso, so I’m not especially worried about lumpiness or preserving the shape of the original torso.
However, if I were working on a sleek model like Lonesome Glory, I would be concerned that if I cut through the middle of his rib cage, that the clay patch over it would look lumpy. In this case, I may cut around the girth instead. The depth of the girth on this mold is an easier place to hide a seam. The flip side is you have to be cautious that you’re not creating an extra long girth in front of a short barrel.
I try to avoid cutting through the flank for the most part because it’s a more complex area to resculpt. The exception here is if I’m trying to correct an issue with collection (but, again, this will be a separate tutorial.)

For this model, I chose to cut right down the middle. I turn to my trusty dremel, equipped with a cutting bit.


Like I did with the shortened model, I dremel the outside edges of the cut with my grinding tool:


This is to leave space for clay to fill the gap.
Next, I take one half of the model and add a couple spots of super glue/baking soda. One spot should be at the top by the withers, and the second should be near the sternum. I try to add the glue on the inside edge of my cut. Repeat, repeat, repeat…

My goal is to build up two short columns to bridge the gap between the front and back halves of my model. Periodically, I line up both halves to check my progress. I eyeball the new proportions.
When I’m happy with the length, I add a drop of glue to the top of each column and attach them to the other half of my model. Like I did with shortening, I hold the model on a flat surface and count to 60 while the glue dries. This guy was still a bit squiggly after being glued together, so I added a few more drops of glue around the columns and dusted it with baking soda.

And my model is still see-through. I fill these large gaps the same way I filled the small gaps last week. I trace the edge of the gaps with glue, hit it with baking soda. Repeat until filled.

At this point, I may need to go back and take off any bulging areas of glue. I go back to my grinding tool and go over the entire filled gap.
Sculpting the back should be easier here than it was on last week’s model, as the back should still look mostly the same shape as the original model. I generally use less clay to cover up the seam on a lengthened model.
The Terrang Drop
I’m sure a few of you are concerned about how secure this seam is. After all, I didn’t add wire to connect the two half or fill the body with foil. But super glue/baking soda is stronger than you think. They use this stuff to repair airplanes. Not just models, the full-sized ones.
So, without further ado, this is a model Terrang reassembled with super glue/baking soda and dropped from a height of 12 feet onto cement:
And the Terrang, post drop:
Show drafts (Clydesdales, American Belgians) have short backs and long legs. It’s aesthetically pleasing to many horse people. These breeds look great in a hitch:
What's not love? Long legs are attractive and legs look longer on shorter backed horses. This same bias (for lack of a better word) carries over into the hobby. The downside of this is that short backs on models--occasionally too short--are not uncommon. And judges are quicker to point out a long back than a short one.
However, that doesn’t mean you shouldn’t lengthen a too-short back. Wrong is wrong no matter who sees it. Eventually a smart judge or discriminating buyer will call you out on it.
For the purposes of this tutorial, I’d like to change this model’s breed from a miniature horse to a Shetland pony. Two features jump out to me immediately as needing changes: the back and the neck. Miniatures--ideally--share their proportions with full sized horses instead of those of classic-styled ponies. I could show you thousands of exceptions to this, but those are not the minis you’ll see in the show rings.
This horse also appears to be holding his head in a high but comfortable head position. He looks like he could rip around a pasture all day like this. Shetlands (Americans excluded) have a naturally low headset. However, necks are a topic for a separate tutorial.
How Do I Lengthen a Back?
I start almost the same way I lengthen a back. I draw a line around the model where I intend to cut. But the difference here is I’m drawing on a thin line instead of a thick one. I have a choice here in where I want to add the length: the girth, mid-barrel, or the flank.
I already know that my finished model will be chubbier and harrier than the original, so that makes my positioning more flexible. I will be sculpting over a large portion of the torso, so I’m not especially worried about lumpiness or preserving the shape of the original torso.
However, if I were working on a sleek model like Lonesome Glory, I would be concerned that if I cut through the middle of his rib cage, that the clay patch over it would look lumpy. In this case, I may cut around the girth instead. The depth of the girth on this mold is an easier place to hide a seam. The flip side is you have to be cautious that you’re not creating an extra long girth in front of a short barrel.
I try to avoid cutting through the flank for the most part because it’s a more complex area to resculpt. The exception here is if I’m trying to correct an issue with collection (but, again, this will be a separate tutorial.)
For this model, I chose to cut right down the middle. I turn to my trusty dremel, equipped with a cutting bit.
Like I did with the shortened model, I dremel the outside edges of the cut with my grinding tool:
This is to leave space for clay to fill the gap.
Next, I take one half of the model and add a couple spots of super glue/baking soda. One spot should be at the top by the withers, and the second should be near the sternum. I try to add the glue on the inside edge of my cut. Repeat, repeat, repeat…
My goal is to build up two short columns to bridge the gap between the front and back halves of my model. Periodically, I line up both halves to check my progress. I eyeball the new proportions.
When I’m happy with the length, I add a drop of glue to the top of each column and attach them to the other half of my model. Like I did with shortening, I hold the model on a flat surface and count to 60 while the glue dries. This guy was still a bit squiggly after being glued together, so I added a few more drops of glue around the columns and dusted it with baking soda.
Together again.
And my model is still see-through. I fill these large gaps the same way I filled the small gaps last week. I trace the edge of the gaps with glue, hit it with baking soda. Repeat until filled.
This can be a time consuming step if you're adding a lot of length to the back and I'm still working on this guy. You can also stick in a few pieces of making tape on the inside of the barrel to have somewhere for the glue to go. It's a pinch thiner this way, but still strong.
At this point, I may need to go back and take off any bulging areas of glue. I go back to my grinding tool and go over the entire filled gap.
Sculpting the back should be easier here than it was on last week’s model, as the back should still look mostly the same shape as the original model. I generally use less clay to cover up the seam on a lengthened model.
The Terrang Drop
I’m sure a few of you are concerned about how secure this seam is. After all, I didn’t add wire to connect the two half or fill the body with foil. But super glue/baking soda is stronger than you think. They use this stuff to repair airplanes. Not just models, the full-sized ones.
So, without further ado, this is a model Terrang reassembled with super glue/baking soda and dropped from a height of 12 feet onto cement:
And the Terrang, post drop:


4 comments:
Eeeep, poor Terrang! That looked like it HURT! O_O
Since discovering your blog I must admit, I've been buying superglue and bicarb like they're going out of fashion - models I thought I'd never manage to mend now have legs again and I've successfully reset a head without the use of any epoxy whatsoever so a huge thank you for the guide! :D
Wow so you fill the whole barrel by building up glue and baking soda? How much glue would that take for this guy do you guess? I'd like to try it on a pony I am wanting to do.
Meanwhile the "bridges" at the withers etc. are used to reconnect the bugger. Well I'll be...LOL!
And yah, most of us like our Am. Cream Drafts shorter in leg. Some in the breed want to grow some legs on them but that wasn't what they originally were. Not only better for center of gravity in pulling but easier to harness too.
Well, the bottle I'm using is .71 oz and I think I may kill a third of it on this guy. I have to admit, this is the first time I've added *this much* length. I usually am just stretching models a touch, but I've added over 1/2 inch to this guy.
Just in case I wasn't clear, I'm not filling the whole barrel with glue. I'm just creating a new surface while leaving the body still hallow. The glue will suspend itself, like a bubble, between the two halves and then I hit it with baking soda. Although for this guy I had to building up the edges quite a bit to get them close enough together for the glue bubble to form.
Wow, now there's a way that makes a lot more sense than "stuffing" the model with tinfoil or the like and then use sculpting clay. Great tutorial! :D I even have a body to try this out.
Post a Comment